Troubleshooting Chocolate Dipping: Fixing Thick, Streaky, or Cracked Coats
Table of Contents
- Start with the right chocolate
- Tempering made simple
- Prep your fruit and snacks
- Dip with control
- Cool and set for a smooth finish
- Fix thick, streaky, or cracked coats
- When chocolate turns thick or clumpy
- When coatings look dull or streaky
- When shells crack after setting
- Make-ahead, storage, and portability tips
- How this fits Meat Recipe Box meal prep
- Trip Box friendly chocolate snacks
- Air fryer assists for speed and cleanup
- Frequently asked questions
- Do I need to temper chocolate for dipping fruit and snacks?
- How do I keep melted chocolate from getting too thick while I work?
- Why did my chocolate seize and can I save it?
- How do I prevent cracking on cookies or bars after dipping?
- What temperature should my centers and workspace be for best results?
Troubleshooting Chocolate Dipping: Fixing Thick, Streaky, or Cracked Coats
A glossy, crack-free chocolate coat makes fruit and snack mixes feel special—and they travel well in lunch boxes, on game days, and in our Trip Box. Here’s how to dip fruit or snacks in melted chocolate properly: choose the right chocolate, keep everything dry, temper to precise temperatures, and cool gradually. If your coating turns thick, streaky, or cracks, use the quick checks and fixes below to recover fast. With a thermometer, a steady hand, and a few smart cooling habits, you’ll get pro-looking results at home. We’ll keep it simple and weeknight-friendly, so you can batch-dip pretzels, dried fruit, or cookie bars as make-ahead, portable snacks alongside your meat-forward mains.
Start with the right chocolate
Couverture chocolate is real chocolate with extra cocoa butter—often 32–39%—so it melts fluidly, coats evenly, and sets with a shiny snap. Look for cocoa butter on the label, not compound fats, for the smoothest dipping results; dry, clean tools are essential for gloss and stability, as shown in King Arthur Baking’s dipping tips (thermometer, gentle heat, and dry bowls are key).
Keep all bowls, spatulas, and forks completely dry. Even a drop of water or steam can cause chocolate seizing—instant graininess that ruins texture and temper—a common issue called out in this tempering troubleshooting guide from Mulu Partners.
Mise en place for stress-free dipping:
- Couverture buttons or chopped blocks
- Reliable digital thermometer
- Heatproof bowl that nests over a pot (double boiler)
- Silicone spatula
- Parchment-lined tray and cooling rack
Quick comparison for dipping:
- Couverture: Most fluid when melted; thinnest, glossiest coats; best snap.
- Baking bars/chips: Chips contain stabilizers; they melt thicker and can leave heavy “feet.”
- Compound coating: Easiest to melt but uses non-cocoa fats; sets firm yet tastes and looks less “true” than tempered couverture.
Tempering made simple
Tempering is the controlled melting, cooling, and slight reheating of chocolate to form stable cocoa butter crystals. The payoff is shine, a clean snap, and a quick set; poor temper looks dull or streaky and softens too easily.
Temperature targets for small batches:
- Dark: Melt to about 122°F (50°C), cool, then work at 88–90°F (31–32°C).
- Milk: Melt to about 105°F (40–41°C), work at 86–88°F (30–31°C).
- White: Melt to about 105°F (40–41°C), work at 82–84°F (28–29°C). These classic ranges are consistent with practical, home-scale methods taught in King Arthur Baking’s dipping guidance.
Cheater bain-marie (fast, repeatable):
- Add two-thirds of your chocolate to a dry bowl set over a pot of just-simmered, then turned-off water.
- Let it soften gently; stir until mostly melted.
- Remove from the pot; add the remaining one-third chocolate (seed) and stir to cool into temper.
- Nudge back up to the working temperature with short, gentle heat if needed.
- Test temper: Swipe a small smear on parchment; it should set within a few minutes, glossy and firm. Mulu Partners notes steady, gentle heat and continuous stirring promote stable crystals.
Microwave alternative: Heat at 50% power in short bursts, stirring between each, and never let water—or steam from a just-washed bowl—near the chocolate.
Prep your fruit and snacks
Bring centers to room temperature and make them perfectly dry before dipping. Cold or wet surfaces thicken chocolate, stress the shell, and can lead to streaks or cracking during set—effects that mirror how chilled, moist substrates disrupt coatings in confectionery and frozen novelty production, as detailed in Palsgaard’s coating control overview.
For very smooth cookies or bars, add a little texture—crumb coat, chopped nuts, or a light sprinkle—so the shell grips and resists flaking. Rougher textures inherently reduce cracking. Line a baking sheet with parchment to catch drips and create neat bottoms for portable, lunchbox-friendly pieces.
Dip with control
Use long-handled dipping tools with fine tines, swirl to enrobe, then “polish” the surface as you lift for a clean finish. Callebaut’s hand-dipped troubleshooting emphasizes tool finesse and keeping tines clean to avoid stray marks.
A simple 5-step dip workflow:
- Submerge and coat fully.
- Lift and invert once to smooth.
- Tap the fork gently against the bowl edge to shed excess and prevent thick “feet.”
- Scrape the fork’s underside on the bowl lip so the base stays neat.
- Slide onto parchment; rotate the fork out to avoid imprints.
If bubbles appear, your chocolate may be too thick; ensure good fluidity. For soft fillings, a quick pre-coat layer that sets firm before cutting and final dipping helps prevent fork imprints and leaks, as highlighted by Callebaut’s troubleshooting notes.
Cool and set for a smooth finish
The goal is a satiny finish with a crisp snap—don’t rush with a fridge blast. Let pieces set at room temperature first; if you must chill, move them only after the initial set so contraction stays even. This steadier set also helps pieces travel cleanly in lunch boxes and our Trip Box. This measured approach, also recommended in Mulu Partners’ tempering fixes, minimizes bloom and surface dullness.
Control the environment. Keep humidity low; excess moisture can haze or streak the finish. If you use molds, warm them slightly toward your working temperature to avoid matte spots and flow lines—advice reinforced by a ChocolateLife thread on streaked bars where temperature mismatches and room humidity were prime culprits.
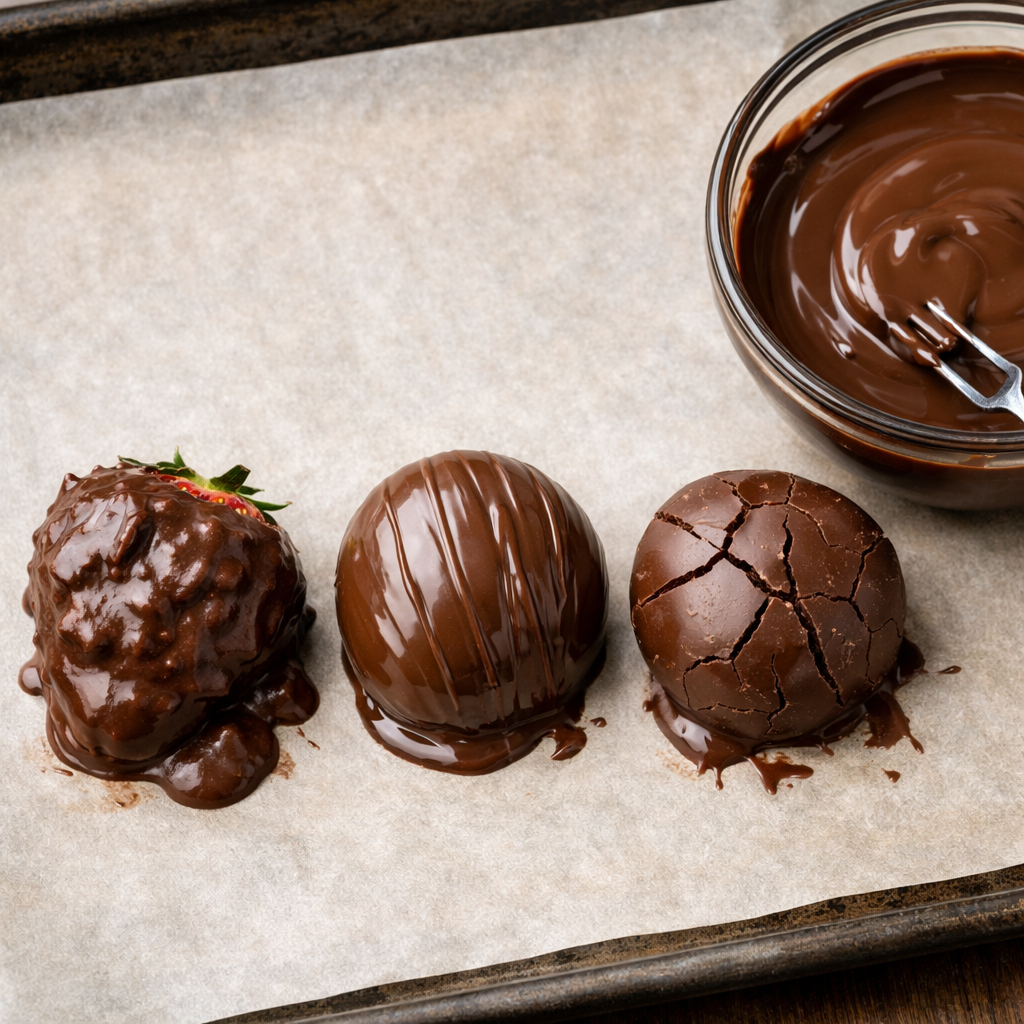
Fix thick, streaky, or cracked coats
Quick recovery checklist:
- Confirm chocolate type and volume (use couverture; keep enough melted mass for thermal stability).
- Check your thermometer and verify temper with a test smear.
- Keep tools fully dry; stir often to maintain fluidity.
- Ensure centers and molds are room temp—not cold or damp.
- Cool gradually with gentle airflow; avoid temperature shocks.
Fast reference:
| Symptom | Likely cause | Fast fix |
|---|---|---|
| Thick or clumpy | Moisture contact; overcrystallized from cooling too far; working too cold | Gently rewarm to working temp; seed with a little freshly melted, tempered chocolate; use tiny, controlled heat bursts |
| Dull or streaky | Temper drift; cold centers/molds; high humidity; miscalibrated thermometer | Rewarm slightly; seed and retest; warm molds near chocolate’s working temp; stabilize room humidity |
| Cracked shells | Rapid cooling; cold centers; uneven thickness with pinholes | Room-first set, then cool; pre-coat moist/cold centers; apply a uniform, slightly thicker coat |
When chocolate turns thick or clumpy
Chocolate naturally thickens as stable crystals build or as moisture migrates from wet or cold fillings; frequent stirring slows this progression, a pattern echoed by experienced makers in a ChocolateLife discussion on overly thick temper. Recover by gently reheating to the working range or by seeding in a small amount of freshly melted, tempered chocolate to restore fluidity and gloss. For flaky bits, short, low-energy heat bursts can smooth the mass—a practical tip demonstrated in this Confectionery House video. If true seizing occurs from water contact, don’t try to re-temper; salvage by adding warm cream or butter for ganache and start a fresh, dry batch for dipping, per Mulu Partners.
When coatings look dull or streaky
Dullness often means temper drift, cold substrates, or humidity swings; even a slightly off thermometer can sabotage precision, as noted in Callebaut’s troubleshooting and ChocolateLife’s mold-temperature discussion. Fix by reheating just into the working window, seeding if needed, and testing a quick strip before resuming. Warm molds and tools to within a few degrees of your chocolate’s working temperature to prevent chilling the shell on contact. Next time, keep humidity steady and stir during cool-down to build stable crystals.
When shells crack after setting
Cracking comes from differential contraction—usually rapid cooling, cold centers, or thin, uneven coats. Retail Confectioners International advises gradual cooling; in production, an 8–12 minute tunnel with an entrance near 65°F and gentle airflow prevents fissures—use that cadence at home: room-temp set first, then a mild cool. For wet or cold centers, add a quick pre-coat moisture barrier and finish with a uniform, slightly thicker shell to ride out transport without splits.
Make-ahead, storage, and portability tips
Once fully set, store dipped treats airtight at cool room temperature with parchment between layers. Avoid humidity swings and only refrigerate if necessary, after the room-first set. For on-the-go, pack snugly in hard-sided containers; add cold packs only after the chocolate is fully set to avoid condensation. Work in smaller tempered batches, stirring regularly so the chocolate doesn’t overcrystallize mid-run—a practical rhythm championed by seasoned makers in ChocolateLife threads. This approach keeps coatings tidy next to proteins in a Meat Recipe Box.
How this fits Meat Recipe Box meal prep
Dipped snacks balance savory, meat-forward mains in our weekly prep: a square of glossy dark chocolate on a pretzel rod next to sliced steak wraps makes lunch feel composed, not cobbled. For more sweet-savory momentum, see our guide to chocolate-dipped desserts that pair with roasted meats, and browse our recipes hub when you’re planning proteins for the week. Building mixed boxes is how we keep commutes sane and weeknights simple.
Trip Box friendly chocolate snacks
Choose durable picks that won’t crumble: chocolate-dipped pretzel rods, dried apricots, roasted nut clusters, and firm cookie bars with a bit of texture (which helps minimize cracking under jostle). Layer with parchment in a hard-sided container, and let pieces cool fully at room temp before they hit the cooler. For balanced Trip Box fuel, pair with sliced steak wraps, turkey snack boxes, or jerky sticks from our high-protein snacks guide.
Air fryer assists for speed and cleanup
Use your air fryer (powered off) as a draft-free cabinet for the initial room-temp set; then move trays to a cool, dry spot to finish. Toast nuts or re-crisp pretzels in the air fryer before dipping to heighten crunch—just cool them completely so residual heat doesn’t push your chocolate out of temper. The basket also doubles as a covered staging rack lined with parchment to shield setting pieces from humidity and dust.
Frequently asked questions
Do I need to temper chocolate for dipping fruit and snacks?
For best shine, snap, and room-temp stability, yes. Tempered chocolate holds up better in a Meat Recipe Box lunch or Trip Box.
How do I keep melted chocolate from getting too thick while I work?
Work in small batches, stir frequently, and keep it within the working temperature; if it thickens, gently rewarm or seed with a little freshly tempered chocolate. This keeps dipping smooth during Meat Recipe Box batch prep.
Why did my chocolate seize and can I save it?
Even a tiny bit of water or steam can make chocolate seize into a stiff, grainy mass; you can’t re-temper it for dipping, but you can turn it into ganache by adding warm cream or butter. Then start a fresh, dry batch for Meat Recipe Box-ready dipping.
How do I prevent cracking on cookies or bars after dipping?
Let centers warm to room temp, apply a uniform, pinhole-free coat, and cool gradually at room temperature before any chilling. This helps treats survive transport in a Trip Box.
What temperature should my centers and workspace be for best results?
Aim for room-temp centers in a cool, dry room; cold or humid conditions thicken chocolate, cause streaks, and increase cracking during set and transport. That way, dipped snacks travel better in Meat Recipe Box meal prep.