Melt Chocolate Without Burning: Microwave and Double Boiler Step-By-Step Guide
Table of Contents
- Before you start
- Tools and ingredients
- Step-by-step: microwave method
- Step-by-step: double boiler method
- Pro tips to prevent burning and seizing
- Which method to use and when
- Uses for melted chocolate in make-ahead meals and bakes
- Storage and reheating
- Frequently asked questions
- What type of chocolate melts best and do chips work?
- How do I fix seized or over-melted chocolate?
- What microwave power and timing should I use?
- How do I keep melted chocolate smooth for dipping and drizzling?
- Do I need to temper chocolate or is simple melting enough?
- More from Meat Recipe Box
- Meat-focused recipe index
- Casseroles and one-pots
- Air fryer quick bites
- Meal plans and planning guides
- Cooking tips, techniques, and meat cuts guide
Melt Chocolate Without Burning: Microwave and Double Boiler Step-By-Step Guide
Melting chocolate without burning it comes down to three things: low, even heat; small, uniform pieces; and bone‑dry tools. If you’re short on time or working with a small batch, the microwave—used in short, moderate‑power bursts with frequent stirring—delivers fast, glossy results. For larger amounts or delicate white and milk chocolates, a double boiler gives you gentler, more controllable heat. Both methods avoid direct, high heat that scorches and keep moisture away so the chocolate stays smooth instead of turning grainy. Below, you’ll find step‑by‑step directions for each method, troubleshooting tips to prevent seizing, and smart ways to use and store your perfectly melted chocolate for make‑ahead treats. At Meat Recipe Box, we default to the microwave for speed and the double boiler for delicate chocolates.
Before you start
Master the fundamentals before you turn on the heat:
- Low, even heat prevents scorching; small, uniform pieces melt consistently; and tools must be absolutely dry. As pros warn, “a single drop of water can seize chocolate,” transforming it from silky to stiff and grainy (see Taste of Home’s guide to melting chocolate).
- Seizing happens when melted chocolate suddenly turns hard, dry, and clumpy because moisture or overheating disrupts the cocoa butter emulsion; once seized, it’s difficult to use as‑is (explained clearly in Completely Delicious’s tips on melting chocolate).
- Quick expectations:
- Microwave: fast, fewer dishes, great for small amounts.
- Double boiler: gentler, more control for bigger batches or precise projects.
These principles underpin every reliable approach to how to melt chocolate, the best way to melt chocolate for your project, and how to prevent seizing from the start.
Tools and ingredients
Gather everything at once so you can melt smoothly without stopping:
- Microwave‑safe or heatproof bowl: for even heating and safety.
- Saucepan + heatproof bowl (to nest as a DIY double boiler).
- Heat‑safe rubber spatula: the best tool for scraping and stirring.
- Good chocolate, chopped into small, even pieces; bars or wafers/discs melt more fluidly than chips, which are formulated to hold shape and resist melting as smoothly (see Tasting Table’s melting guide). At Meat Recipe Box, we favor bars or wafers for a smoother melt.
- Note sensitivity: milk and white chocolates have lower melting points and scorch more easily—use gentler heat (also outlined by Tasting Table).
- Optional enhancer: about 1 tablespoon coconut oil per cup of chocolate for extra gloss and flow when dipping (as suggested by The Life Jolie on melting chocolate chips).
Step-by-step: microwave method
- Chop chocolate into small, even pieces and place in a completely dry, microwave‑safe bowl (as recommended by Taste of Home on melting chocolate).
- Microwave at 50–70% power for 30 seconds. Stir thoroughly, then continue in 15–30 second bursts, stirring after each interval (per Coracao Confections’ microwave method and Taste of Home).
- Stop when the chocolate is 80–90% melted. Stir off‑heat so residual warmth finishes the melt for a glossy, lump‑free texture (per Coracao Confections).
Callout: Melting a very small amount? Switch to 10‑second intervals to avoid hot spots (noted by The Life Jolie).
Why it works: Short, moderate‑power bursts limit overheating and eliminate the steam exposure risk you get with water baths, keeping the chocolate smooth and burn‑free (see King Arthur Baking on melting chocolate and Serious Eats’ testing of the best ways to melt chocolate).
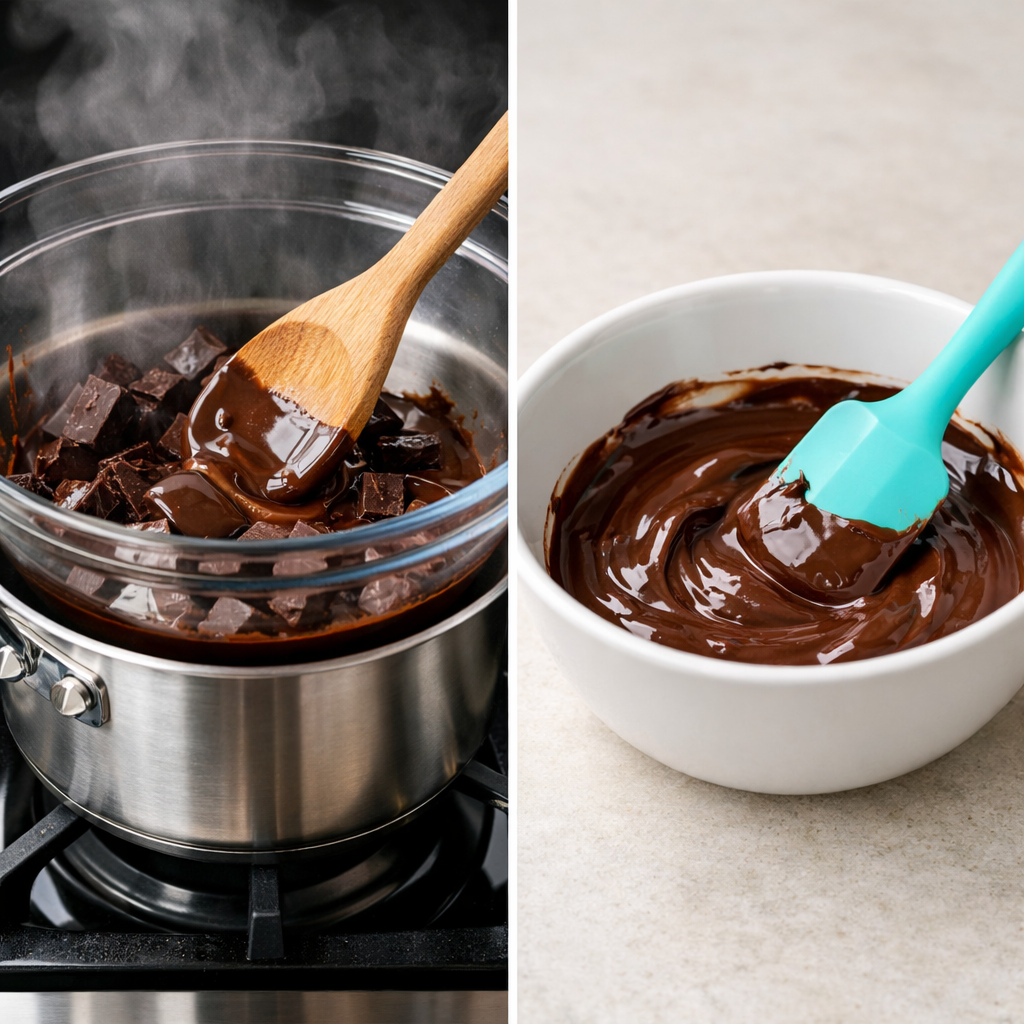
Step-by-step: double boiler method
- Add 1–2 inches of water to a saucepan and bring to a bare simmer. Set a dry, heat‑safe bowl on top, ensuring the bottom of the bowl does not touch the water (per Always Eat Dessert’s double‑boiler tutorial).
- Add chopped chocolate; stir gently and frequently with a rubber spatula until almost melted (Always Eat Dessert).
- Remove from heat just before fully melted; residual warmth will finish it (Always Eat Dessert).
Pro variants:
- DIY double boiler: a metal or heatproof bowl over a saucepan (outlined by Taste of Home).
- “Open” water bath: set the bowl in a skillet of barely simmering water for extra control (shared by Tasting Table).
- For ultra‑gentle melting, turn off the flame and rely on residual heat to finish (also from Tasting Table).
Caution: Keep steam and splashes away—water causes seizing (Always Eat Dessert).
Pro tips to prevent burning and seizing
- Dryness is non‑negotiable: bowls, spatulas, and hands must be completely dry; even a drop of water can seize chocolate (Taste of Home on melting chocolate).
- Choose the right form: skip chips when you need ultra‑smooth flow—use chopped bars or wafers for the best melt (Tasting Table’s guidance).
Troubleshooting:
- If chocolate begins to seize, stir in about a teaspoon of warm water or a few drops of neutral oil to help smooth it; texture may change, but it’s often salvageable for sauces or baking (per Coracao Confections’ advice).
- Stir frequently; white chocolate needs extra care and lower heat to avoid overheating (noted by Taste of Home).
- Direct‑pan melting over low heat is possible but carries a higher burn risk—monitor constantly (King Arthur Baking).
Which method to use and when
| Method | Best for | Pros | Watchouts |
|---|---|---|---|
| Microwave | Small quantities, quick drizzles | Fastest, fewest dishes, minimal setup | Go low power; stir often |
| Double boiler | Larger batches, delicate types | Gentle, precise, great control | Guard against steam/splashes |
- Niche options for context:
- Slow‑cooker water bath: set jars of different chocolates in one pot to melt multiple types at once (Taste of Home).
- Sandwich‑bag‑in‑hot‑water method for tidy drizzling (Taste of Home).
- Oven‑adjacent warming: rest a bowl on top of a 350°F oven for slow, even softening (Tasting Table).
Uses for melted chocolate in make-ahead meals and bakes
- Drizzle over slab brownies, rocky road bread pudding, or breakfast loaves; let set fully before slicing and boxing.
- Dip pretzels, strawberries, or cookies; cool on parchment until firm for lunchbox treats.
- Swirl into yogurt pots or overnight oats; chill for grab‑and‑go snacks.
Technique modifiers: For a thinner, glossier dip, add about 1 tablespoon coconut oil per cup of chocolate; a small pat of butter or a few drops of neutral oil can also improve flow and shine for glazing (as noted by The Life Jolie).
Storage and reheating
- Storage: Let dipped or drizzled items set completely before packing. Store airtight at cool room temperature unless perishable fillings require refrigeration.
- Reheating: Re‑melt gently using the original method—microwave at 50–70% power in short bursts or return to a low‑heat double boiler; stop at 80–90% melted and finish off‑heat (per Coracao Confections and Always Eat Dessert).
- Prevent moisture: Avoid fridge condensation by letting containers come to room temperature before opening; remember, water triggers seizing (Always Eat Dessert).
Frequently asked questions
What type of chocolate melts best and do chips work?
Couverture bars or wafers melt most smoothly because they’re formulated for fluidity. Standard chocolate chips can work in a pinch, but they’re designed to hold shape; at Meat Recipe Box, we use wafers or chopped bars when we want a smooth melt.
How do I fix seized or over-melted chocolate?
Stir in about a teaspoon of warm water or a few drops of neutral oil to loosen; it can salvage texture for sauces or baking, though it may not regain perfect gloss. If it’s scorched, start over for best flavor—that’s our rule at Meat Recipe Box.
What microwave power and timing should I use?
Use 50–70% power: start with 30 seconds, stir, then continue in 15–30 second bursts, stopping when 80–90% melted and finishing with residual heat. For tiny amounts, switch to 10‑second bursts; that’s our go‑to for small finishes at Meat Recipe Box.
How do I keep melted chocolate smooth for dipping and drizzling?
Keep tools completely dry, stir frequently, and avoid overheating. For extra flow and shine, add about 1 tablespoon coconut oil per cup of chocolate, which is our standard when batching at Meat Recipe Box, then let dipped items set fully before packing.
Do I need to temper chocolate or is simple melting enough?
For quick drizzles and bakes, simple melting is fine. For glossy, snappy shells that resist bloom, tempering is best—use a thermometer and gentle heat to hold chocolate within its tempering curve; that’s the method we follow for special finishes at Meat Recipe Box.
More from Meat Recipe Box
Meat-focused recipe index
Build protein‑forward mains and add a small chocolate treat on the side—then browse our ideas for pairing sweets with savory, starting with 10 chocolate‑dipped desserts that pair beautifully with roasted meats: https://www.meatrecipebox.com/posts/10-chocolate-dipped-desserts-that-pair-beautifully-with-roasted-meats/
Casseroles and one-pots
Hearty casseroles and one‑pots hold well for 3–4 days and anchor any lunchbox; tuck in a few chocolate‑dipped pretzels or a brownie square for balance. For a make‑ahead dessert to slice and pack, try our Rocky Road Bread Pudding: https://www.meatrecipebox.com/rocky-road-bread-pudding/
Air fryer quick bites
Keep weeknights nimble with snackable, protein‑rich air‑fryer bites that reheat well; melt chocolate in the last 2–3 minutes while the fryer finishes to cap dinner with an easy drizzle.
Meal plans and planning guides
Batch smart: schedule chocolate dipping on prep day, let items set overnight, then portion for Tue–Fri grab‑and‑go. Think: Mon batch cook + dip, Tue–Fri pack and enjoy.
Cooking tips, techniques, and meat cuts guide
Confidence with chocolate is another kitchen win alongside our technique‑first approach to meats. Explore skills that pay off across recipes: water‑bath awareness, heat control, and knife work for uniform chopping.