Beginner Steak Preparation Checklist: Tools, Temperatures, and Timing Tips
Table of Contents
- Meat Recipe Box
- Essential tools for first-time steak success
- Cast iron skillet
- Instant read thermometer
- Long stainless tongs
- Cutting board and sharp knife
- Salt, high smoke oil, and finishing butter
- Pan sear, grill, broil, or oven finish
- Doneness temperatures for beginners
- Timing by thickness and method
- Resting and carryover cooking
- Simple seasoning and basting basics
- Common mistakes to avoid
- Quick weeknight steak game plan
- Frequently asked questions
- What tools do I really need to cook steak well at home?
- What internal temperature should I aim for for medium rare?
- How long do I cook a 1 inch steak on the stove or grill?
- When should I pull the steak off heat to account for carryover?
- Do I need to marinate, and how should I rest and slice the steak?
Beginner Steak Preparation Checklist: Tools, Temperatures, and Timing Tips
Steak night doesn’t need to be stressful. This beginner steak preparation checklist boils success down to three pillars: the right tools, clear internal temperature targets, and simple timing by thickness. Use a cast-iron skillet for a fast crust, an instant-read thermometer for doneness, and a short rest to finish perfectly juicy. Below, you’ll find a beginner steak guide with a steak doneness chart, steak cooking times, and step-by-step flows tailored to weeknights.
Meat Recipe Box
Our promise: real food that fits your life—fast, flavorful, reliable. Mastering steak basics turns out dinner that fits picky eaters and busy schedules alike. When you’re ready to cook, jump to our steak-cooking hub for recipes and techniques, or browse our quick, family-friendly mains in our recipe collection:
- Meat Recipe Box steak-cooking hub: https://www.meatrecipebox.com/tags/steak-cooking/
- Quick, family-friendly mains: https://meatrecipebox.com/categories/recipes/
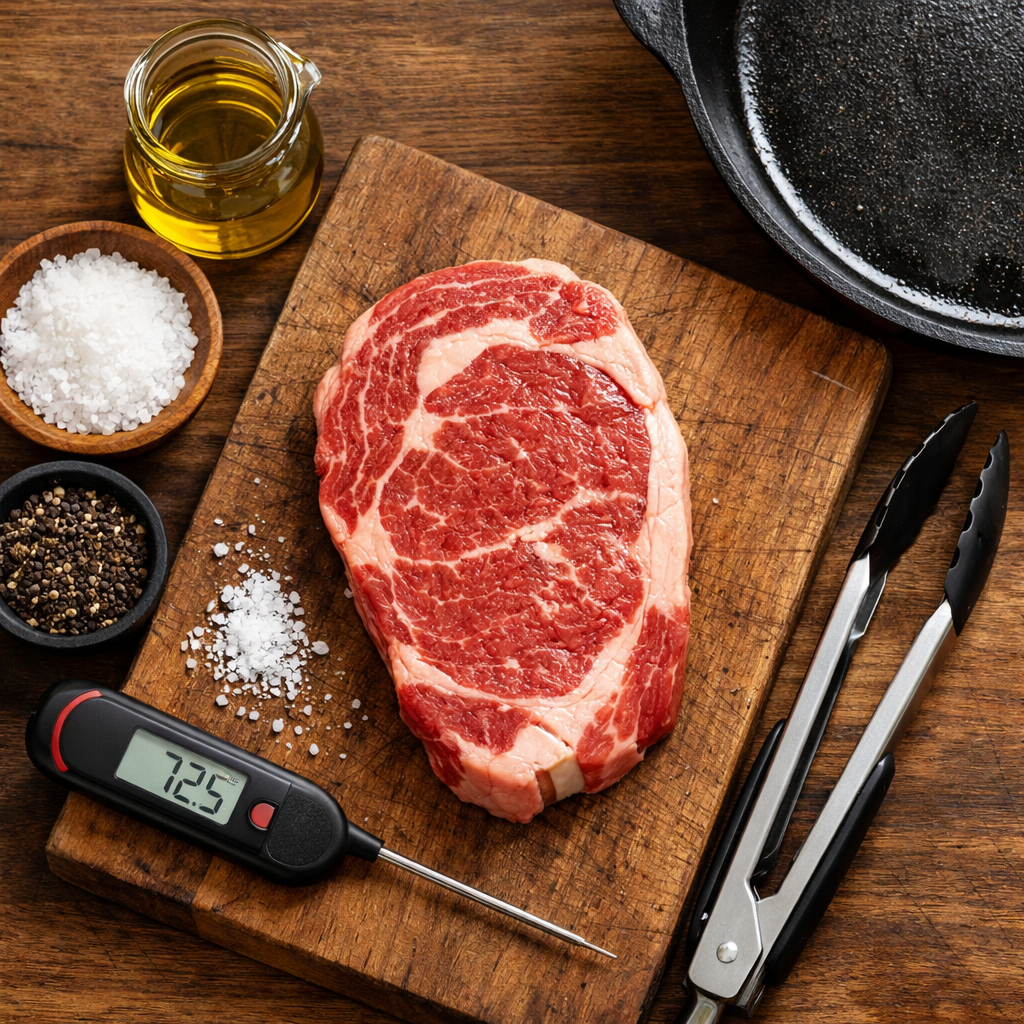
Essential tools for first-time steak success
A minimal, budget-friendly kit removes guesswork and sets you up for a great crust and clean slicing. Cast iron is your go-to because cast iron’s heat retention builds a deep, even crust, especially when preheated properly (see the note on cast iron’s heat retention). Thermometers, not color, are your doneness truth; time is only a starting point, as reinforced by Pillsbury’s steak temperatures guide and ThermoWorks’ steak temperature guide. For gear inspiration, see this grill and pan gear roundup. For step-by-step technique support, our steak-cooking hub backs up each stage with clear cues.
Tools checklist and smart picks:
- Cast-iron skillet (10–12 inch)
- Instant-read thermometer
- Long stainless tongs (12 inch)
- Sturdy cutting board
- Sharp knife
- Kosher salt
- High-smoke-point oil
- Butter, garlic, and herbs for finishing
| Tool | Why it matters | Budget / Pro pick |
|---|---|---|
| Cast-iron skillet | Retains high heat for a deep crust and even browning; ideal for searing and oven-finishing. | Lodge 12-inch / Field Company No.10 |
| Instant-read thermometer | The only reliable way to verify doneness without guessing by color or time. | ThermoPro TP19H / Thermapen ONE |
| Long stainless tongs (12") | Flip without piercing (keeps juices in) and keep hands safely away from high heat. | OXO 12" / Vollrath 12" |
| Cutting board | A stable, knife-friendly surface to rest and slice. | Plastic/bamboo board / Boos maple board |
| Sharp knife | Thin, clean slices against the grain for tenderness. | Victorinox Fibrox chef’s or slicing knife / Wüsthof slicer |
| Kosher salt | Large crystals season evenly and help draw surface moisture for better sear. | Diamond Crystal / Morton |
| High-smoke-point oil | Lets you preheat hot without burning or bitter flavors (see definition below). | Refined canola or grapeseed / Avocado oil |
| Butter + herbs | Quick baste adds gloss and savory depth in the final minute. | Any unsalted butter + garlic/rosemary |
Cast iron skillet
Cast iron is the most forgiving pan for beginners because it holds heat exceptionally well and builds a robust crust when properly preheated (see cast iron’s heat retention). To use it:
- Preheat: Heat a dry skillet over medium-high until a thin sheen of oil shimmers and a wisp of smoke appears.
- Sear: Lightly oil and salt the steak; lay it in the pan and don’t move it until a crust forms.
- Flip: Turn with tongs; repeat until the crust is even.
For thick cuts (1¼ inches or more), sear 2–3 minutes per side, then move the skillet to a 400°F oven to finish to your target, as outlined in Pillsbury’s steak temperatures guide and this grill and pan gear roundup. Meat Recipe Box recipes cue oven-finish timing by thickness so you can hit temp without guesswork.
Instant read thermometer
“Internal temperature, not time or color, is the true measure of steak doneness.” — ThermoWorks’ steak temperature guide
Insert the probe into the thickest part of the steak, angling toward the center and avoiding bone or large seams of fat for accuracy, as shown in this steak temperature chart. Budget thermometers like ThermoPro TP19H read fast and reliably; premium models like the Thermapen are even faster and ultra-precise. Meat Recipe Box recipes specify pull temps and rest ranges by method to keep results consistent.
Long stainless tongs
Use tongs, not a fork. Piercing the meat leaks juices and can dull your crust. Twelve-inch stainless tongs offer leverage and distance from heat; skip silicone tips at high searing temps (see cast iron’s heat retention).
Cutting board and sharp knife
A sturdy, knife-friendly board keeps your blade sharp and provides space to rest and carve. Food52’s meat-prep tools highlight Boos boards for durability under frequent use. After resting (details below), slice thinly against the grain with a sharp knife for maximum tenderness. Our guides reinforce this rest-and-slice sequence.
Salt, high smoke oil, and finishing butter
A high-smoke-point oil resists burning at high temperatures, making it ideal for searing steak. Options like avocado, grapeseed, or refined canola let you preheat the pan hot enough to form a deep crust without bitter, burnt flavors or excessive smoke in the kitchen.
Season simply: use about 1 teaspoon kosher salt per pound. If you’re sensitive to pepper scorching, crack it on post-sear. In the last 1–2 minutes, baste with butter, smashed garlic, and rosemary for richness, a technique widely recommended in cast iron how-tos (see cast iron’s heat retention). Meat Recipe Box recipes keep seasoning straightforward for repeatable flavor.
Pan sear, grill, broil, or oven finish
- Grill: High heat and smoky char; preheat to 450–500°F for the best crust, per Pillsbury’s steak temperatures guide.
- Pan-sear: Quickest crust and easy butter-basting control on the stovetop.
- Sear then oven: Sear 2–3 minutes per side, then finish in a 400°F oven for thicker cuts.
- Broil: Intense top heat that mimics grill char when you can’t cook outdoors.
Decision mini-flow:
- 1 inch or thinner → pan or grill.
- Thicker than 1¼ inches → sear in cast iron, finish in the oven.
In Meat Recipe Box recipes, the method is matched to cut thickness and weeknight timing.
Doneness temperatures for beginners
Use this starter steak doneness chart to choose your finish. Always verify with an instant-read thermometer, as advised in Pillsbury’s steak temperatures guide.
| Doneness | Target internal (°F) |
|---|---|
| Rare | 120–125 |
| Medium-rare | 130–135 |
| Medium | 140–145 |
| Medium-well | 150–155 |
| Well | 160–165 |
Safety note: Kansas City Steaks’ temperature and times page reflects the USDA guidance to cook whole cuts to 145°F and rest 3 minutes. For steakhouse-style medium-rare, many cooks pull earlier, then rely on a proper rest (see carryover cooking below). Ruth’s Chris temperature tips echo these practical doneness ranges for ordering and cooking at home. For an at-a-glance reference, the Meat Recipe Box steak-cooking hub consolidates these ranges with pull temps.
Timing by thickness and method
For a 1-inch steak on medium-high heat, plan roughly 4–5 minutes per side for medium-rare and 6–7 minutes per side for medium. Instacart’s steak cooking chart shows rare at about 2–3 minutes per side and medium-rare at 3–4 per side; always confirm with temperature.
Approximate medium-rare timelines (adjust ±1–2 minutes for other doneness levels and heat variance):
| Thickness | Pan-sear (med-high) | Grill (450–500°F) | Sear + 400°F oven |
|---|---|---|---|
| ¾ inch | 2–3 min/side | 2–3 min/side | Not needed |
| 1 inch | 3–4 min/side | 4–5 min/side | Optional: 2 min/side sear + 3–5 min oven |
| 1½ inches | 3 min/side sear | 4 min/side sear | 2–3 min/side sear + 5–10 min oven |
Note: Pull steaks 5–10°F below your final target to account for carryover, then rest.
Resting and carryover cooking
Carryover cooking is the rise in internal temperature that continues after meat leaves the heat. Heat stored in the exterior moves inward, increasing doneness by several degrees as the steak rests. Planning for this prevents overshooting your target and keeps juices from spilling out when sliced. Our recipes build in a pull-temp buffer to account for this.
Remove steaks 5–10°F below your desired final temperature. Rest 3–10 minutes on a board, tented loosely with foil. Don’t stack steaks, and slice against the grain after the rest for tenderness. These thermometer and resting practices align with this steak temperature chart and Kansas City Steaks’ temperature and times resource.
Simple seasoning and basting basics
- Pat steaks very dry.
- Salt 30–60 minutes ahead (or right before if you’re tight on time).
- Sear in a thin film of high-smoke-point oil.
- Baste with butter, garlic, and rosemary in the final 1–2 minutes. Add cracked pepper after the sear if you’re sensitive to scorching; finish with a pinch of flaky salt for pop.
Common mistakes to avoid
- Guessing doneness by color or time—always use an instant-read thermometer (see Pillsbury’s steak temperatures guide and ThermoWorks’ steak temperature guide).
- Starting in a lukewarm pan—preheat thoroughly for a proper sear (see cast iron’s heat retention).
- Skipping the rest—carryover will finish the cook and keep juices in (see steak temperature chart).
Quick weeknight steak game plan
- 5-minute prep: Pat dry, salt, and preheat the pan (oil just starts to shimmer) or grill (450–500°F), per Pillsbury’s steak temperatures guide.
- 8–10-minute cook: For 1-inch steaks, sear 3–4 minutes per side for medium-rare; baste the last 1–2 minutes; verify temp and pull 5–10°F early (Instacart’s steak cooking chart and Kansas City Steaks’ temperature and times are handy references).
- 5-minute finish: Rest, slice against the grain, serve with an easy side. For ideas, browse our steak-cooking hub and our quick mains collection:
- Meat Recipe Box steak-cooking hub: https://www.meatrecipebox.com/tags/steak-cooking/
- Quick mains: https://meatrecipebox.com/categories/recipes/
Frequently asked questions
What tools do I really need to cook steak well at home?
A cast-iron skillet, instant-read thermometer, 12-inch tongs, a sturdy cutting board, and kosher salt plus high-smoke-point oil are enough; finish with butter, garlic, and herbs. Find a short checklist in the Meat Recipe Box steak-cooking hub.
What internal temperature should I aim for for medium rare?
Target 130–135°F for medium-rare and pull 5–10°F early to allow carryover during a 3–10 minute rest; Meat Recipe Box recipes note pull temps by method.
How long do I cook a 1 inch steak on the stove or grill?
For medium-rare, cook about 4–5 minutes per side on medium-high heat. For quick checks by thickness and method, see the Meat Recipe Box steak-cooking hub.
When should I pull the steak off heat to account for carryover?
Remove the steak when it’s 5–10°F below your final target and rest 3–10 minutes; Meat Recipe Box recipes cue pull temps so you don’t overshoot.
Do I need to marinate, and how should I rest and slice the steak?
You don’t need a marinade for good steaks—salt, sear, and a quick butter baste deliver big flavor. Rest 3–10 minutes, then slice thinly against the grain; Meat Recipe Box guides walk you through both steps.